How to pass an airtightness test, Part 1: design and build for airtightness
Airtightness is critical in new buildings. Here’s how you can pass your airtightness test first time by planning for it from the start.
Airtightness tests are now mandatory for many new buildings.
In Ireland, under the latest regulations, all new buildings must pass an airtightness test on completion. In the UK, proposed changes to building regulations may introduce mandatory testing for all new homes later this year.
These rules mark significant changes for many in the building industry, for whom airtightness testing may still be a relatively new phenomenon.
In this two-part blog post, we will look at how to ensure your building passes its airtightness test, first by outlining some tips for how to design and build an airtight building, and then, by explaining how airtightness testing (also known as air permeability testing) works, and what you need to do to prepare for test.
The advice in this blog post is only intended to give you a flavour of what’s involved in designing and building for airtightness — we recommend anyone working on construction projects undergo practical airtightness training delivered by experts.
What is airtightness anyway?
Everyone is familiar with the feeling of an unwanted cold draught coming through a poorly-sealed door or window, and the frustration of needing to turn up the thermostat to keep warm.
When all the air leaks in a building are added up, they can amount to a substantial source of heat loss. For example, the worst allowable airtightness result for new homes built in England and Wales is 10m³/hr/m² (more on these units of measurement later) — this adds up to hole of 0.44 m², about the size of a typical ATM machine.

The building regulations in England and Wales allow cumulative air leaks in new homes that add up to an air gap approximately the size of an ATM machine. Photo: @jankolario on Unsplash
This goal of airtightness, then, is to eliminate these air leaks from your building envelope by sealing unwanted gaps and cracks through which warm air can escape and cold air can enter. Because we have been used to leaky buildings in the UK and Ireland for a long time, airtightness represents a relatively new challenge to how we design and construct buildings.
It’s not just about heat loss
It’s easy to understand why air leaks can be a major source of heat loss, and how reducing them can cut your heating bills and your carbon footprint. But there are other good reasons for airtight construction.
For example, draughts can carry moist air, which can condense when it hits any cold surface inside your walls or roof. This can cause dampness, which can lead to mould and rot, as well as carrying unhealthy mould spores into your home.
What about fresh air?
One common concern people raise when they first hear about airtightness is, ‘what about fresh air? I don’t want to live in a hermetically sealed house!’. This is why the subject of airtightness is so closely intertwined with ventilation. This is best encapsulated by the phrase ‘build tight, ventilate right’ – meaning that when building an airtight home, it’s crucial at the same time to install a properly designed ventilation system to deliver fresh air.
Mechanical ventilation systems like heat recovery or demand-controlled ventilation generally work most effectively in airtight properties. Such systems extract moist ‘stale’ air and replace it with just the right amount of fresh air, delivered where it’s needed. This is more efficient and healthier than relying on air moving in through the building’s structure (or not moving, depending on the weather) and potentially carrying moisture and mould spores.
How is airtightness measured?
It’s also useful to understand how airtightness is measured— there are generally two main ways. The first is air changes per hour (ACH), the number of times the total volume of air in a building is replaced by fresh air during one hour.
The second is air permeability (m³/hr/m²), the amount of air (in cubic meters, m³) that passes through one square metre of a building’s external surface per hour. In Ireland and the UK, these figures are usually measured at 50 Pascals of pressure during an airtightness test.
Airtightness levels in the UK & Ireland
In Ireland, as of November 2019, dwellings can have a maximum permitted airtightness of 5 m³/hr/m², while in England and Wales the maximum currently allowed for new homes is 10 m³/hr/m². The UK government’s recent Future Homes Standard consultation proposes to tighten this to 8 m³/hr/m² in England later this year (the same figure is also proposed for Wales, while in Scotland the new build standard for homes is currently 7 m³/hr/m²).
In reality, the building industry regularly beats these figures. In Ireland, the average air permeability of new dwellings was about 2.9 m³/hr/m² last year. In the UK, one study of homes built between 2010 and 2014 found an average air permeability of 4.9 m³/hr/m² for non-passive house dwellings.
Airtightness standard for passive house
The onerous passive house standard, by comparison, demands an airtightness score of 0.6 air changes per hour at 50 Pascals of pressure (this typically works out to less than 1.0 m³/hr/m² in air permeability). As energy efficiency standards for new buildings continue to get tighter, and nearly zero energy buildings (NZEBs) become the norm, it’s likely that airtightness standards will become even more onerous in future.

It starts with design
The first thing to state about delivering airtightness is that it is not just something for either the design or build team to worry about — it’s the responsibility of both, working together, and it requires a degree of collaboration that has not been always been the norm on our construction sites. It means everyone working towards a common goal, rather than individual sub-contractors trying to get a job done as quickly as possible.
Achieving airtightness starts at the design stage. This is because simple and clear design makes airtightness much easier to achieve on site.
“A designer can’t just write airtightness target into a contract. They have to make it easily achievable – that is a design responsibility.”
passive house expert Nick Grant told Passive House Plus magazine’s guide to airtightness. He recommends that designers should do some airtightness sealing and attend blower door tests “to get a feel for what is involved”. He says:
“Designing a detail in 2D in a warm office is not the same as trying to sort where three such details happen to join on a wet afternoon”.
Airtight design ideally starts with making your building as simple as possible. Air most typically leaks at junctions where different building elements meet (roofs and walls, walls and floors, window openings, service penetrations, and balcony connections, to give just a few examples). Designing a simple building form that limits the number of these junctions will make airtightness easier for the build team to achieve.
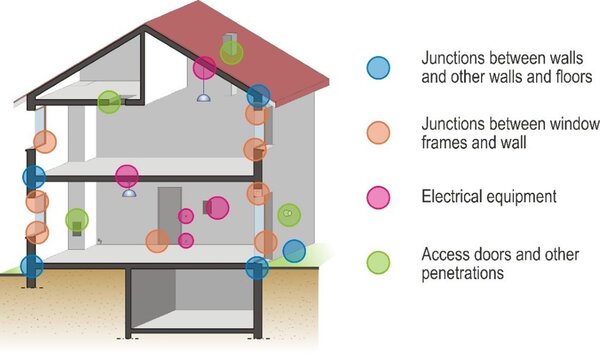
Vertical section of a typical dwelling showing key junctions where air leakage is likely to occur. Photo: CEREMA (CC-BY-SA 3.0)
Of course, this should not preclude interesting design and architectural expression! But the more complex a building is, the more challenging it will be to achieve high levels of airtightness. Simple junctions with easy to understand details are also critical.
Set a clear target
It’s also important to know what your airtightness target is from the outset. Are you simply trying to meet the building regulations, or to achieve a more onerous standard such as passive house? A clear goal will keep the design and build teams focused. Set a target for your initial test that is significantly better than whatever minimum you must achieve, in case the airtightness layer subsequently becomes damaged after initial test, for example during the final fix.
Where is your air barrier?
Designers should set out a clear air barrier strategy for the entire building. This should identify what material forms the air barrier for all the key building elements — walls, roof, floor etc. — and where exactly it is in the construction build-up. It should also specify how these different elements will be connected in an airtight manner at key junctions.
This air barrier strategy should be communicated to the entire design and build team, and all sub-contractors. This can be done via a single clear drawing of the building that shows the air barrier and what materials comprise it, as well as how key junctions and penetrations are to be sealed.
Types of air barrier
It is crucial to specify high quality materials for your air barrier, otherwise it may fail during the lifetime of the building. I know one recent example of a passive house in Ireland that was re-tested for airtightness more than a decade after being built, and significant new leakage was found. Upon investigation, it was discovered that during construction the builders had run out of specialist airtightness tape and used duct tape instead, and this had peeled off in the intervening years.
Some common materials used as primary air barriers are:
- A vapour control membrane, such as SIGA Majpell® or SIGA Majrex®. Vapour control membranes are commonly used with timber construction but can be used in many wall types. As well as providing airtightness, they are designed to control the movement of moisture to protect building elements.
- A parge/plaster layer on masonry/blockwork.
- Oriented Strand Board (OSB). However, research suggests the airtightness of regular OSB can vary greatly from product to product. The Passive House Institute says leakage through OSB can account for 20 to 40% of air leakage in a passive house built to 0.6 air changes per hour. Specialist airtight OSB boards are also now available, however.
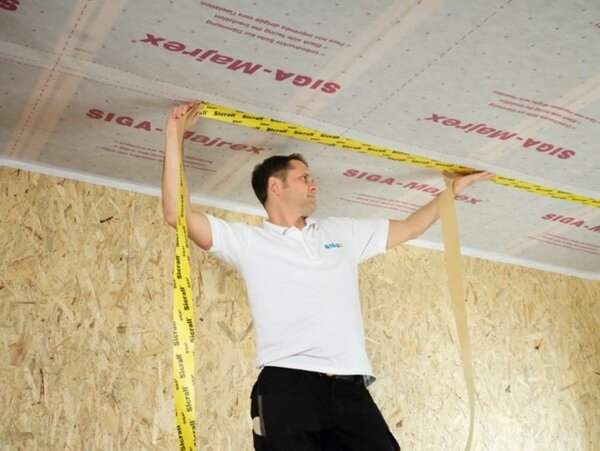
SIGA Majrex. Photo: SIGA
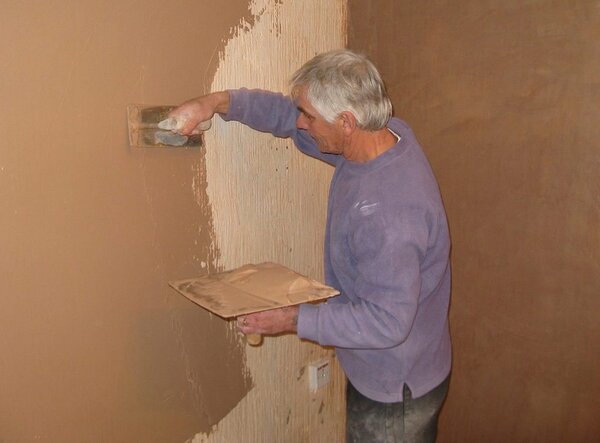
An internal parge/plaster coat is one common form of air barrier, particularly on masonry projects. Photo: Wikimedia
In cool climates, the air barrier is generally installed on the room-side of the main insulation layer. This is to stop moisture-laden air from inside the building moving out, getting trapped in the insulation layer and condensing there. A wind-tight layer should also be specified on the outside of the insulation layer, to protect the insulation from the elements and make sure it functions effectively.
This can be achieved through an outer layer of brick or block, though in timber frame construction a wind-tight membrane like SIGA Majcoat® or Majvest® is often specified. Wind-tight membranes are always more ‘vapour-open’ than internal vapour control layers, to allow any moisture that gets into the building structure to escape outwards.
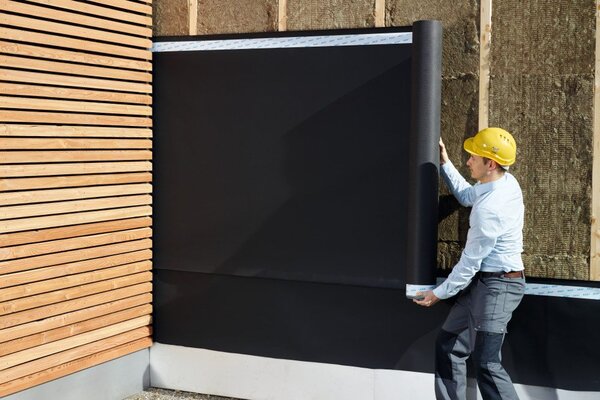
SIGA Majvest© SOB. Photo: SIGA
Service penetrations through the air barrier should also be kept to a minimum. One way to achieve this is by designing a service cavity on the room-side of the air barrier, which can also provide a space to install extra insulation.
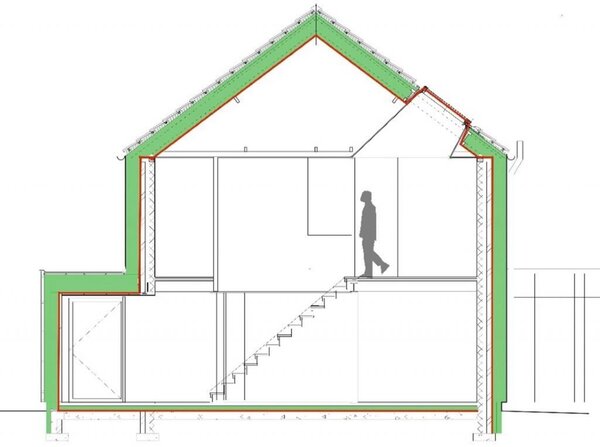
Section showing a simple building envelope with the air barrier plane clearly illustrated in red. Image: Hesketh Hayden Architects
Project specifications
Your project specifications can identify the air permeability target, the air barrier strategy, and the responsibility of different contractors as regards to airtightness, as well any requirements for an airtightness champion on site (more on this below). An airtightness expert can also be engaged at this stage to review the air barrier strategy and the airtight design.
JOIN A WORKSHOP FOR ARCHITECTS
SIGN UP HEREUpskill for airtightness
It is essential that the project manager and airtightness champions are appropriately trained in all relevant aspects of airtightness. This can be arranged by engaging an airtightness expert to provide training or by attending relevant training courses. ‘Toolbox talks’ can be arranged on site for trades to provide a practical demonstration of their airtightness responsibilities on site. SIGA offers workshops in airtightness for architects and designers (see here for Ireland and here for UK) as well as for builders (see here for Ireland and here for UK). Representatives of high-quality airtightness products are often happy to send representatives to building sites, too, to help ensure their products are installed properly.
JOIN A WORKSHOP FOR BUILDERS
SIGN UP HERECommunicating detail
More detailed drawings showing the air barrier at individual junctions, sections and penetrations can be prepared, with the air barrier clearly identified in a distinct colour. These should be large, clear and easy to understand. The BRE, in its excellent guide to airtightness in passive houses, advises that:
“Final production drawings should also contain sequenced illustrations of the key stages involved in installing the airtight barrier at complex junctions. Any careful sequencing needed to install a membrane or create an air-tight seal should be annotated on these drawings.”
Three-dimensional drawings and renderings of details could also be prepared if they will aid installation.
Become an airtight champion
Good project management is essential to ensuring the airtightness design is realised on site. One way to help achieve this is by appointing an ‘airtightness champion’. This could be someone whose role is to ensure the integrity of the air barrier throughout the build, and to make sure all site operatives know their responsibilities with regards to airtightness. The airtightness champion can operate a checklist of potential leakage points throughout the building.
The airtightness champion should be someone with the authority to make decisions on site. But should ideally not be the site manager, who may not have the time to dedicate to the role.
It is also crucial to have a clear plan for airtightness testing from the outset — both spot testing to find individual leakage points during the build, and whole-building testing near and on completion.
In the second part of this blog post, we’ll take an in-depth look at airtightness testing. You’ll receive answers to the following questions
- How does airtightness testing work?
- What different types of tests are there?
- What do you need to do to get a building ready for testing?
Want to read on? Check out our recommended article.
Recommended article

Lenny Antonelli
Lenny is a journalist who covers the environment and sustainability. He has been writing about the built environment for over a decade, and is deputy editor of the sustainable building magazine Passive House Plus.


