Preparing for airtightness in concept and developed design stages
This is the second instalment of our guide running from concept to handover, what needs to happen at each RIBA stage to achieve a successful airtightness test.
Achieving airtightness through the RIBA work stages of construction
So, what does it take to achieve that successful blower-door test result? In this previous article with focus on RIBA stages 1-2 we covered early design stage. We proposed that it takes more than having the right kit to succeed. You need a focussed attitude that starts early and follows through all the way. In that way, airtightness is like karate!
In this article, we are focussing on the late-design stage aka the technical or developed design. By the start of RIBA stage 3 you should have already:
- appointed a competent team,
- set a challenging yet achievable airtightness target in writing, and
- have at least identified which layer forms the airtightness barrier in the wall, floor and roof
RIBA Stages 3-4 Developed & Technical Design

In stages 3 and 4 designers add flesh to the bones of the outline strategy. The building takes its physical coordinated shape. The main strategies are defined, and costed. By the end of stage 4 the complete project will be described. The connections should be mostly resolved so that the design team is confident that they have produced a working, buildable, affordable concept that meets the client’s needs.
The contractor’s scope of work, the performance targets, and how they will be measured, will be set out clearly. In the later stages there is usually further design work including selection of the final products. Your stage 4 information needs to allow some guidance and flexibility for this.
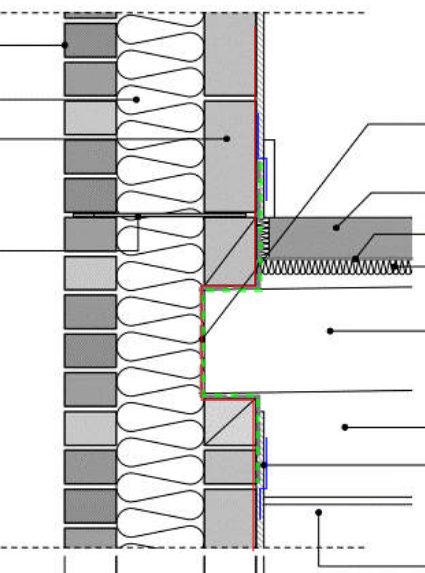
A stage 4 detail; This is a wall to intermediate floor detail with red line for AVCL identified, plus the materials (tapes, membranes, plaster) identified by colour and labelled (label text not shown). Image credit: Passivhaus Trust – Good Practice Guide to Airtightness v10.3
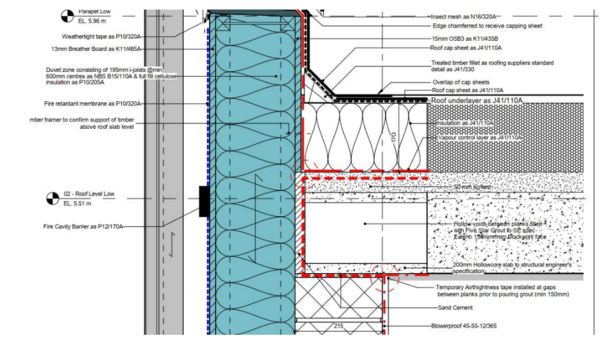
Example section drawing of a wall to roof connection, pre cast roof slab. Image credit: Passivhaus Trust_Good Practice Guide to Airtightness v10.3
Airtightness Tips for RIBA stages 3-4
Get the brief right.
- Define what the air- and vapour control layer (AVCL) is to be in each element – roof, wall, floor and soffit – how is the AVCL jointed to itself and to all edges e.g. taped, sealed, liquid membrane to guarantee this “continuous” airtight barrier
- Have a costed budget for the airtight works and materials
Get the detail design right.
- Produce detailed drawings of each junction – refer to section 3 of the Passivhaus Guide to Airtightness for tips on level of detail required
- Simplify wherever you can. Reduce or eliminate interfaces with structural elements e.g. rafters or joists; add additional structural members if necessary to reduce the amount of fiddly taping
- Reduce penetrations and allow space for a service void; allow an internal service void for wiring
- Allow for sufficient space, so that airtight connections can be jointed together (in other words, space for your hands, a hand is 10cm wide so a gap of 2cm would not be sufficient)
Understand the sequencing of works and access
- Imagine you are to fit a tailor-made suit for an elephant. No easy task. So, you will want to keep it simple. Look to eliminate junctions altogether, or to reduce complexity
- Allow >150mm space around unavoidable MEP penetrations, to give the installer enough space to apply tapes in tight corners
- Allow for movement joints and use fire partition lines as air lines where you can to simplify the planning
- Create staged installation drawings, so that the contractor on site understands the process of installation and he does not try to install a product afterwards

Sequential installation drawings. Designers should look at IKEA or Lego instructions for exemplars of universal assembly instructions
Make sure the contractor allows cost for training & engagement
- Hold workshops with the contractor to agree roles and responsibilities, training requirements, programming of tests and sequencing of assembly
- Appoint an airtightness coach (supervisor) on site
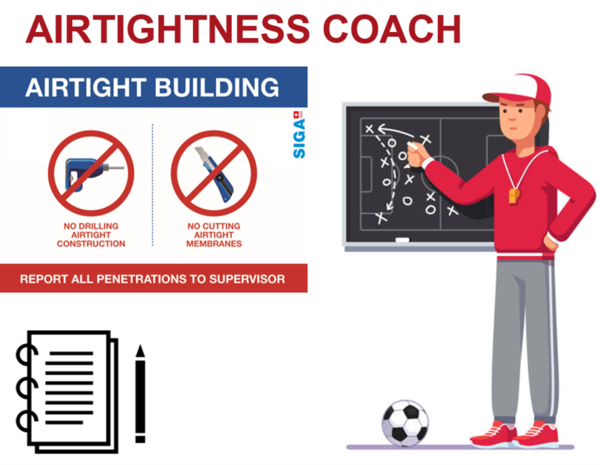
- Outline requirement for quality control and communication via e.g. site induction and site noticeboards
- Make sure you allow for required testing
- Allow for testing of each apartment (e.g. for part L) as well as the whole building (e.g. for passive house) if necessary
- Include pre-testing in the construction programme – allow for pre-testing of certain areas as they become ready. Do this testing before you start boarding up the wall; when you can still reach the airtight layer. Consider these areas in plan and section drawings
- Get help! Seek advice from SIGA
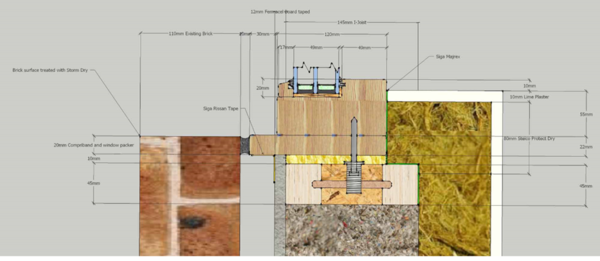
A window sill installation detail, suitable for RIBA 4, from Zetland Road PassivHaus Plus Retrofit. All materials are identified; key measurements are given; the airtightness and moisture risk is resolved, and the assembly sequence has been considered. The designer used images in place of hatching, which is unconventional, but does make the drawing more accessible. Image credit: Ecospheric
SIGA Airtightness guide for RIBA stages
SIGA have created a handy guide to what to do at each stage, as Application Engineer Stan Admiraal explains:
«In stage 3 we are requested to work on the spatial coordination, so really work on where it is easiest and most protected to install the airtightness. In stage 4 we can then choose the specific products that would work best and gives us the most reliable airtight envelop. Planning an uninterrupted airtightness will save us a lot of money in the long-run. Ask any ex-president – “Failing to Prepare, is Preparing to Fail” (Benjamin Franklin)»
Download your copy of the RIBA Stages Guide here:
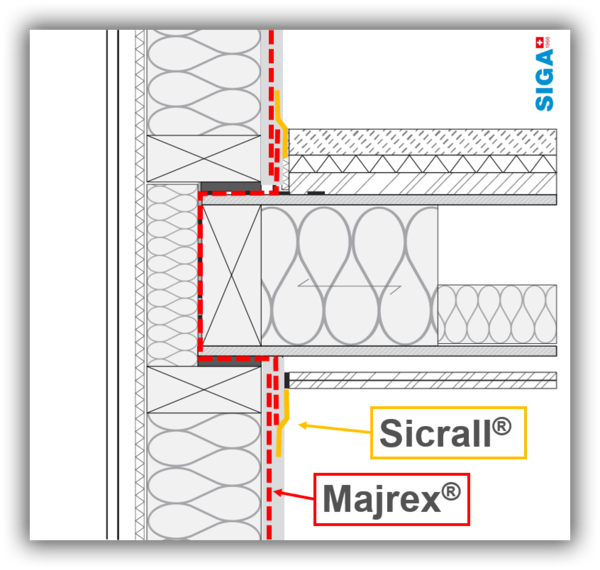
Identify each material (or equal and approved) and how it will be connected.
Conclusion to RIBA stages 3-4 for airtightness
These stages are absolutely “make or break” for the project’s final test result.
A considered stage 4 design will avoid lengthy and costly overruns trying to sort it out at the end of construction.
By following the principles described here and in SIGA’s guide, you should grasp control of the most challenging performance target there is.
Simply put: an airtight build is a mark of quality and durability.
Do you think we have we missed something critical? Let us know in the comments!
Links to helpful further resources
Check out SIGA’s manual.
The application guide is like reading Lego instructions – the graphical instructions are bold and clear; to help builders and designers understand how the AVCL will be assembled.
For further resources, check the sources at the bottom of this article.

Bertie Dixon
Bertie has practised building services engineering and sustainability consulting in the UK for 15 years. He is a certified PassivHaus planner. He is on a mission to help you deliver a high-quality building, one that does what it says on the tin.


